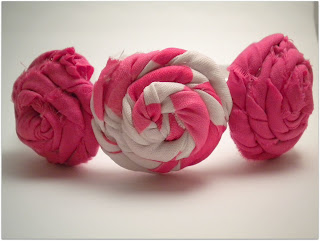
Have you ever tried to take photos of close up small objects and the lighting never comes out right? I have been selling stuff on Ebay for years and now I'm about to launch an Etsy site. And I have always had trouble getting the lighting right on photos!
I never have time during the day to take photos out in natural light.
If I use the flash on close up photos then the picture comes out as one big flash.
And if I don't use flash then the photo is too dark and blurry.
Well I have discovered the perfect solution to this problem! It's called a light box. You can buy light boxes and light tents at photography stores but they can easily run you $100 or more! So because I'm frugal I set out to make my own. And as it turns out...it's quick, simple, and cheap to make your own light box!
The photos end up looking so professional:
Here's the tutorial on how to make your own today!
{I just decided to make this without any planning so I just grabbed whatever was in my house and made up my own way. But many of these items and steps can be substituted for other items.}
The supplies you will need:
1.
A cardboard Box {The squarer the box is the better. But as you can see all I had was a rectangular one and it turned out just fine)
2.
White Fabric {I always have fabric in my house so I just used some I had lying around. I got it at JoAnne's craft store and it was only $1.99/yard and I didn't use even nearly half a yard. You can also find cheap fabric at Walmart}
3.
White Poster board or Card stock {Because I did not plan ahead I didn't have any poster board on hand. So I used heavy scrapbooking paper and it worked just fine!}
4.
Tape and/or glue {I set out with the intention of using tape on the fabric. This way if I wanted to swap the fabric out with a different color then it would be quick and easy. But alas I ran out of tape and used glue instead. The glue is more sturdy. But tape would be a great solution also!}
5.
A Box Cutter
6.
Measuring Tape or Ruler
7.
Marker or Pen
8.
A lamp or lamps with a white light bulb. {I did not use a white light bulb and half of my pictures came out yellow! eew! So I'm heading today to get a white light bulb. But with the right angle my pictures still came out great in the mean time}
Directions
1. Start with any side of your box. Measure a boarder around your box that is 2 inches on every side. This will give your box a good sturdy frame.
2. Take your box cutter and cut out the squares on all 4 sides.
3. Cut off the top and your box should look like this.
4. Now this step if the most time consuming. Take each side of the box and trace it on the fabric. Cut out the fabric squares and glue them on to all four sides of the box But NOT on the top of the box.
5. As you can see I have turned the box on it's side. this open side was the top of the box. The bottom of the box is now your backdrop. So take your scrapbooking paper, card stock, or poster board {whichever you used} and cut it to fit the bottom of your now turned over box. This is where you can use tape instead of blue if you want change out the paper for different colors.
6. Next it's time to hang the paper. This is where you are going to place the objects you are taking a photo of. I took two pieces of 12" by 12" scrapbook paper and glued them together. I then placed glue {you can also use tape} on a small section along the top and glued that so the top of the paper is touching the top of the box. This then allows your paper or poster board to hang down and make a nice sloping effect. I also put a little bit of fabric in the back behind the paper to hide the cardboard color.
7. Your all done now! Just take your light and put it on top shining down. I also sometimes put a light to the right to make it even brighter.
Here are the Results
Please let me know if you have any questions :)
I am happy to help and let me know if you tried this tutorial! I always love seeing the photos of what you come up with :) It makes it all worth it to put up tutorials like this!
Thanks for swinging by and checking out this tutorial. If you would like to share this tutorial with others please copy my link also. If you simply copy and paste the information then both my site and yours will go down in search ratings. Thanks :)
And check back again soon for more photos and tutorials! New ones are being added all the time.


